Super User

Super User

Widgetkit

The Widgetkit Lightbox allows you to view images, HTML and multi-media content on a dark dimmed overlay without having to leave the current page.

Features at a glance

  • Display images, videos, HTML, Iframes, Ajax requests and SWF
  • Supports YouTube, Vimeo, MP4 (h.264), WebM and FLV movies
  • Group lightboxes and mix different content types
  • Responsive design to fit images great on mobile devices
  • Load other widgets in lightbox
  • 3 different opening and closing transitions
  • 4 different caption styles
  • Keyboard and mouse scroll wheel navigation
  • Build on the latest jQuery version
  • Works with Joomla and WordPress

Examples

Different animations - fade, elastic and none

<a data-lightbox="transitionIn:fade; transitionOut:fade;" href="/images/demo/gallery/column_4/1_big.jpg"><img class="pic3d" src="/images/demo/gallery/column_4/1.jpg" border="0" alt="fade" width="250" height="165" /></a>

Different title positions- float, inside and over

<a data-lightbox="transitionIn:elastic; transitionOut:elastic; titlePosition:float;" href="/images/demo/gallery/column_4/5_big.jpg" title="Lorem Ipsum is simply dummy text of the printing and typesetting industry"><img class="pic3d" src="/images/demo/gallery/column_4/5.jpg" border="0" alt="fade" width="250" height="165" /></a>

You can use it in a gallery

<a data-lightbox="transitionIn:elastic; transitionOut:elastic; titlePosition:float; group:gallery1" href="/images/demo/gallery/column_4/8_big.jpg" title="Lorem Ipsum is simply dummy text of the printing and typesetting industry"><img class="pic3d" src="/images/demo/gallery/column_4/8.jpg" border="0" alt="fade" width="250" height="165" /></a>

Various examples in one gallery (try also using the keyboard and mouse scroll wheel)

Lorem ipsum dolor sit amet, consectetur adipisicing elit, sed do eiusmod tempor incididunt ut labore et dolore magna aliqua. Ut enim ad minim veniam, quis nostrud exercitation ullamco laboris nisi ut aliquip ex ea commodo consequat. Duis aute irure dolor in reprehenderit in voluptate velit esse cillum dolore eu fugiat nulla pariatur. Excepteur sint occaecat cupidatat non proident, sunt in culpa qui officia deserunt mollit anim id est laborum.

Load Widgets In A Lightbox

Use #wk-ID to load widgets like slideshows or galleries in a lightbox. For example: Widgetkit Slideshow

<a data-lightbox="width:945;height:637;" href="#wk-2">Lightbox</a>

How To Use

Use the HTML5 custom data attribute data-lightbox to activate the lightbox. You can set various lightbox parameters to the data attribute. For example:

<a data-lightbox="width:1000;height:600;" href="http://www.wikipedia.org">Lightbox</a>

Here is a list of the most common parameters:

  • titlePosition - How should the title show up? (float, outside, inside or over)
  • transitionIn - Set a opening transition. (fade, elastic, or none)
  • transitionOut - Set a closing transition (fade, elastic, or none)
  • overlayShow - Set to true or false
  • scrolling - Set to yes or no
  • width - Set a width in pixel
  • height - Set a height in pixel
  • padding - Set a padding in pixel

Reveal Lightbox

The reveal lightbox allows you to view modules in a pop overlay that slides from the top. There are three positions that you could place your module that will popup in the reveal lightbox:

  • reveal-a - Uses the stacked module layout. This can be used to show one or more modules, one on top of the other, on the reveal popup.
  • reveal-b - Uses the equal module layout. This can be used to show one or more modules, side by side, on the reveal popup.
  • reveal-c - Uses the double module layout. This can be used to show one or more modules, one bigger than the rest, on the reveal popup.

You can set different sizes of the reveal lightbox by adding one of the following module suffix: small, medium, large or xlarge

To show the reveal on a page, add the module you want to show in the popup in one of the above module positions and on your button or link use the data-reveal-id attribute as follows:

<a class="button-color button-action" href="#" data-reveal-id="reveal-a">Sign Up</a>

Examples

Popup 1 Popup 2 Popup 3


The Widgetkit Slideshow is the ultimate image and content slideshow for Joomla and WordPress. It's flexible, easy to customize and completely build with HTML5 and CSS3.

Features

  • Clean and very lightweight code
  • 17 eye-catching transition effects
  • Uses hardware accelerated CSS3 animations
  • JavaScript animation fallback for all Internet Explorers
  • Support for HTML captions
  • Swipe navigation on mobile phones
  • Built with HTML5, CSS3, PHP 5.2+, and the latest jQuery version
  • Works with Joomla and WordPress

Slideshow Screen Example

This is an image slideshow with the famous scale effect.

  • tempor invidunt ut labore et dolore magna aliquyam erat, sed diam voluptua metus vitae gravida dignissim.

  • tempor invidunt ut labore et dolore magna aliquyam erat, sed diam voluptua metus vitae gravida dignissim.

  • tempor invidunt ut labore et dolore magna aliquyam erat, sed diam voluptua metus vitae gravida dignissim.

  • tempor invidunt ut labore et dolore magna aliquyam erat, sed diam voluptua metus vitae gravida dignissim.

Slideshow Default Example

This is an image slideshow with eye-catching transition effects.

  • tempor invidunt ut labore et dolore magna aliquyam erat, sed diam voluptua metus vitae gravida dignissim.

  • tempor invidunt ut labore et dolore magna aliquyam erat, sed diam voluptua metus vitae gravida dignissim.

  • tempor invidunt ut labore et dolore magna aliquyam erat, sed diam voluptua metus vitae gravida dignissim.

  • tempor invidunt ut labore et dolore magna aliquyam erat, sed diam voluptua metus vitae gravida dignissim.

How To Use

The Widgetkit Slideshow takes full advantage of the very user-friendly Widgetkit administration user interface. It has never been easier to create and manage all the slideshows and their different slides in one place. After you created a slideshow you can load it anywhere in your theme using shortcodes or the universal Widgetkit Joomla module or WordPress widget.


The Widgetkit Spotlight allows you to add an overlay to your images which fades or moves in on mouse hover. The overlay can be an image or HTML content. The default magnifier spotlight is a perfect match to be used with a lightbox.

Features

  • Create nicely animated image overlays
  • Supports custom image or HTML content overlays
  • 5 different animation modes
  • Build on the latest jQuery version
  • Works with Joomla and WordPress

Examples

If no custom overlay is set the default spotlight fades in an overlay with an magnifier image. If you define a custom overlay you can choose between different animations - fade, bottom, top, right and left.

How To Use

Use the HTML5 custom data attribute data-spotlight to activate the spotlight.

<a data-spotlight="on" href="/mypage.html">
  <img src="/image.jpg" width="180" height="120" alt="" />
</a>

To create a custom overlay use a div element with the CSS class overlay. You can set the effect parameter to the data attribute. For example:

<a data-spotlight="effect:bottom;" href="/mypage.html">
  <img src="/image.jpg" width="180" height="120" alt="" />
  <span class="overlay">Custom Overlay</span>
</a>

You can set the effect parameter to fade, bottom, top, right and left.

We are social. Get Connected.

We are social. Get Connected.

alt-icon

Believe that life is worth living and your belief will help create the fact. We help your ideas come to life. The world owes you nothing. It was here first. If you don't like something, change it; If you can't change it, change your attitude.

user_1

I'm glad I discovered arrowthemes.

Steve Reiff
Head of Development, Unaniweb
user_2

Few companies stand behind their work like arrowthemes does.

Carey Mary
Sales Executive, Ogilvee

Theme Features

Uneedo Joomla theme utilizes the latest features of the fast and slick Warp theme framework built by Yootheme. It comes with a broad range of layout and module variations as well as a neat set of shortcodes to style your content. Read on to learn more about this theme and its features:

  • Available for Joomla 2.5 and Joomla 3.x
  • Unlimited color variations
  • Choose from 8 fonts for header, menu and body
  • 4 module style combinable with 4 badges and 6 icons
  • 50+ module positions
  • Widgetkit (lite) edition - a powerful toolkit for Joomla and Wordpress
  • Flexible template and column widths
  • Responsive design

Theme Styles and admin options

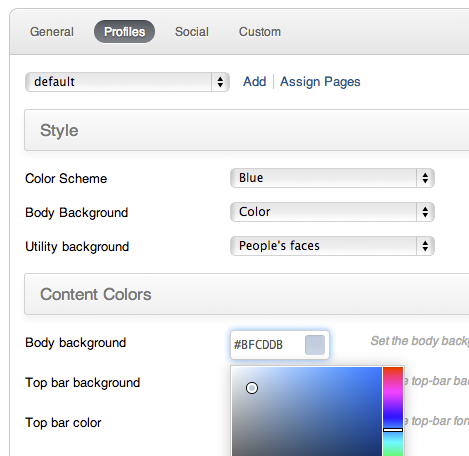
Uneedo Joomla template comes with different style variations to give you flexibility and variety. In addition to these styles, you can tweak several other style settings like colors and fonts right from the admin panel. Combining the different style options allows you to create your own unique theme design.

template admin options

Theme Profiles

Uneedo Joomla template comes with some nice theme profiles built with different styles, colors and fonts, you can choose from in the theme administration. You can create your own profiles and even assign them to different menu items.

Theme Layout

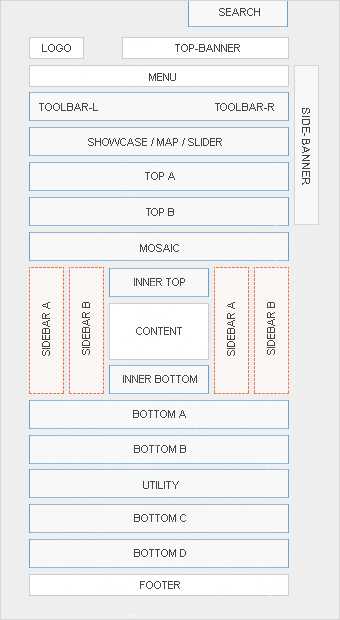
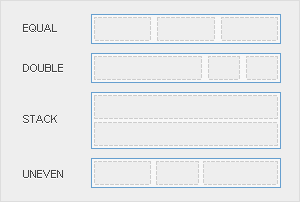
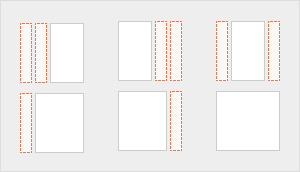
Uneedo Joomla theme comes with a standard module layout. The module positions in blue borders allow to choose a module layout which defines the module alignment and proportions: equal, double, uneven or stack. You can easily add your own module layouts. The two available sidebars, highlighted in red, can be switched to the left or right side and their widths can easily be set in the theme administration. For modules in the blue and red positions you can choose different module styles. Take a look at the module variations page to get an overview.

Module Positions
Module LayoutsColum Layouts

Shortcodes

You can create some beautiful content by using some simple HTML elements. Uneedo theme offers some neat styles for all HTML elements and a great set of CSS classes to style your content. Basic HTML is very easy to learn and this small guide shows you how to use all styles using rokCandy shortcodes.

Basic HTML Elements

Here is a short demonstration of text-level semanticts. The <p> element creates a new paragraph. It will have some space before and after itself. To turn your text into hypertext just use the <a> element.

This is an H1 Heading

This is an H2 Heading

This is an H3 Heading

This is an H4 Heading

This is an H5 Heading
This is an H6 Heading

H1 with a dotted line

H2 with a dotted line

H3 with a dotted line

H4 with a dotted line

H5 with a dotted line
H6 with a dotted line

Text-level semantics

You can emphasize text using the <em> element or to imply any extra importance the <strong> element. Highlight text with no semantic meaning using the [mark] element[/mark]. Markup document changes like inserted or deleted text with the [del] element[/del] or [ins] element [/ins]. To define an abbreviation use the [abbr] element [/abbr] and to define a definition term use the [dfn] element [/dfn].


Simple Unordered List

  • Lorem ipsum dolor bullet-1
  • consectetur adipisicing elit
  • sed do eiusmod tempor

  • Lorem ipsum dolor bullet-2
  • consectetur adipisicing elit
  • sed do eiusmod tempor

  • Lorem ipsum dolor bullet-3
  • consectetur adipisicing elit
  • sed do eiusmod tempor

  • Lorem ipsum dolor bullet-4
  • consectetur adipisicing elit
  • sed do eiusmod tempor

  • Lorem ipsum dolor bullet-5
  • consectetur adipisicing elit
  • sed do eiusmod tempor

  • Lorem ipsum dolor bullet-6
  • consectetur adipisicing elit
  • sed do eiusmod tempor

  • Lorem ipsum dolor bullet-7
  • consectetur adipisicing elit
  • sed do eiusmod tempor

  • Lorem ipsum dolor bullet-8
  • consectetur adipisicing elit
  • sed do eiusmod tempor

To use the bullet list style create a list in the following format

[list bullet-1][li]...[/li][li]...[/li][/list]

Special Unordered List

  • Lorem ipsum dolor special-1
  • consectetur adipisicing elit
  • sed do eiusmod tempor

  • Lorem ipsum dolor special-2
  • consectetur adipisicing elit
  • sed do eiusmod tempor

  • Lorem ipsum dolor special-3
  • consectetur adipisicing elit
  • sed do eiusmod tempor

  • Lorem ipsum dolor special-4
  • consectetur adipisicing elit
  • sed do eiusmod tempor

  • Lorem ipsum dolor special-5
  • consectetur adipisicing elit
  • sed do eiusmod tempor

  • Lorem ipsum dolor special-6
  • consectetur adipisicing elit
  • sed do eiusmod tempor

  • Lorem ipsum dolor special-7
  • consectetur adipisicing elit
  • sed do eiusmod tempor

  • Lorem ipsum dolor special-8
  • consectetur adipisicing elit
  • sed do eiusmod tempor

  • Lorem ipsum dolor special-9
  • consectetur adipisicing elit
  • sed do eiusmod tempor

  • Lorem ipsum dolor special-10
  • consectetur adipisicing elit
  • sed do eiusmod tempor

  • Lorem ipsum dolor special-11
  • consectetur adipisicing elit
  • sed do eiusmod tempor

  • Lorem ipsum dolor special-12
  • consectetur adipisicing elit
  • sed do eiusmod tempor

To use the special list style create a list in the following format

[list special-1][li]...[/li][li]...[/li][/list]

Quotations and Code

Inline quotations can be defined by using the <q> element.

The blockquote element defines a long quotation which also creates a new block by inserting white space before and after the blockquote element. This is an emphasis within the blockquote

To use the blockquote style create a paragraph in the following format

[blockquote author="name"]some content here [/blockquote]

To define a short inline computer code use the <code> element. For a larger code snippet use the <pre> element which defines preformatted text. It creates a new text block which preserves both spaces and line breaks.

pre {
    margin: 15px 0;
    padding: 10px;
    font-family: "Courier New", Courier, monospace;
    font-size: 12px;
    line-height: 18px;
    white-space: pre-wrap;
}

Use the <small> element for side comments and small print.


Block Numbers and Events

1 Tempor invidunt ut labore et dolore magna aliquyam erat, sed diam voluptua. At vero eos et accusam et justo duo dolores et ea rebum.

2 Tempor invidunt ut labore et dolore magna aliquyam erat, sed diam voluptua. At vero eos et accusam et justo duo dolores et ea rebum.

3 Tempor invidunt ut labore et dolore magna aliquyam erat, sed diam voluptua. At vero eos et accusam et justo duo dolores et ea rebum.

03:dec

Tempor invidunt ut labore et dolore magna aliquyam erat, sed diam voluptua. At vero eos et accusam et justo duo dolores et ea rebum.

12:apr

Tempor invidunt ut labore et dolore magna aliquyam erat, sed diam voluptua. At vero eos et accusam et justo duo dolores et ea rebum.

30:may

Tempor invidunt ut labore et dolore magna aliquyam erat, sed diam voluptua. At vero eos et accusam et justo duo dolores et ea rebum.

To use the block number style create a paragraph in the following format

[block-number]{number}[/block-number]

To use the event-time block style create a paragraph in the following format

[event 03:dec] your description here[/event]

Useful CSS Classes

Here is a short demonstration of all style related CSS classes included in this theme.

Highlight Content

Drop caps are the first letter of a paragraph which are displayed bigger than the rest of the text. You can create a drop cap using the CSS class dropcap. To emphasize text with some small boxes use <em> element with the CSS class box.

This simple box is intended to group large parts of your content using the CSS class [box content]...[/box].

This is a simple box to highlight some text using the CSS class [box note]...[/box].

This is a simple box with useful information using the CSS class [box info]...[/box].

This is a simple box with important notes and warnings using the CSS class [box warning]...[/box].

This is a simple box with additional hints using the CSS class [box hint]...[/box].

This is a simple box with download information using the CSS class [box download]...[/box].

Use the CSS class dotted to create a dotted horizontal rule.


Tables

Create a zebra stripped table using using the CSS class zebra.

Table caption
Table HeadingTable HeadingTable Heading
Table Footer Table Footer Table Footer
Table Data Table Data Data Centered
Data Bold Table Data Data Centered
Table Data Table Data Data Centered

Definition Lists

Create a nice looking definition list separated with a line by using the CSS class separator.

Definition List
A definition list is a list of terms and corresponding definitions. To create a definition list use the <dl> element in conjunction with <dt> to define the definition term and <dd> to define the definition description.
Definition Term
This is a definition description.
Definition Term
This is a definition description.
This is another definition description.

CSS3 Tags

Blog Tags are used to highlight keywords or search words in a blog or site content. These tags have been designed with pure CSS3 and additional fallback for older browsers. Need more styles? Get them here

Joomla Wordpress html envato themeforest codecanyon html5 css3

To use the CSS tags in your content use the following format:

[tag url="{url}"]{your tag}[/tag]

Toggles

Toggles are a nice way to minimize hidden sections on a page by only showing titles of the hidden text while maximizing on space. This allows the user to only view what he/she is interested in with a sleek slide down/up of the hidden content. A good example on how to use them is FAQs.

  • closed toggle

    [toggle state="close" title="your title"]your hidden text here[/toggle]

  • open toggle

    [toggle state="open" title="your title"]your hidden text here[/toggle]

Buttons

Normal Button

normal default This is an expandable button 

To use the buttons in your content use the following format:

[button href="#"]button text[/button]

Color Button

normal default This is an expandable button 

To use the buttons in your content use the following format:

[button color href="#"]button text[/button]

Forms

Create a clearly arranged form layout with fieldset boxes using the CSS class box.

Form legend


Module Variations

This theme comes with different module styles, badges and icons. For each module you can pick a style and combine it with an icon or badge to create your own unique look. Here is a list of the available options:

Styles mod-color, mod-dark, mod-transparent, mod-white
Badges badge-hot, badge-new, badge-free, badge-top
Icons icon-download, icon-twitter, icon-mail, icon-bubble, icon-login, icon-cart
Subscribe to this RSS feed